Testing a UIViewController in Swift
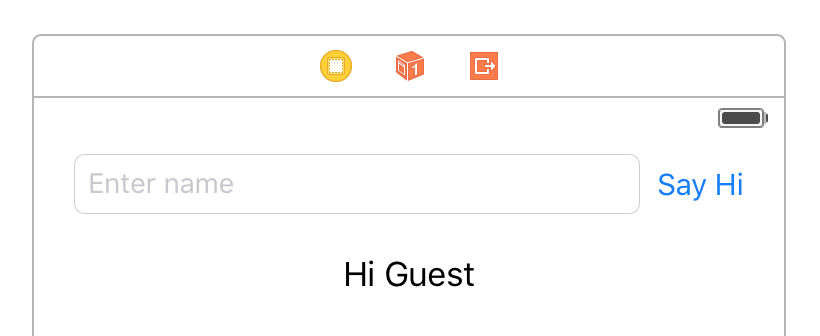
This article is an introduction on how to unit test a view controller using Quick, a BDD-style testing framework. We’ll be testing a view controller where the user can enter their name into a text field, tap a button, and see a greeting.
If you haven’t experimented with creating outlets and actions to link elements in interface builder to a view controller yet, this is your moment. See you in a few minutes.
To get started we’ll need a UIViewController with a UITextField, UIButton,
and UILabel wired up from the interface builder to our code. You can use a
Storyboard or a NIB file to define your view controller’s interface.
The Interface

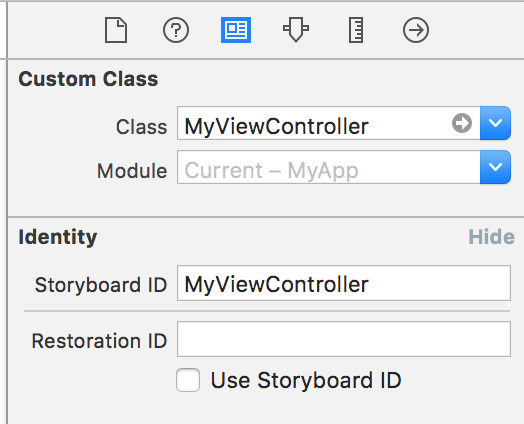
Remember to set the Class to MyViewController using the Identity Inspector
tab, otherwise you won’t be able to create outlets and actions. While you’re
there make sure to set the Storyboard ID to MyViewController too:

The UIViewController
1
2
3
4
5
6
7
8
9
10
11
import UIKit

class MyViewController: UIViewController {
    @IBOutlet weak var nameTextField: UITextField!
    @IBOutlet weak var sayHiButton: UIButton!
    @IBOutlet weak var greetingLabel: UILabel!

    @IBAction func didTapSayHi(sender: UIButton) {
        // Not implemented yet
    }
}
Testing time!
In your test target, create a new Swift file named MyViewControllerSpec.swift.
Here we’ll start to setup our test:
1
2
3
4
5
6
7
8
9
10
11
12
13
14
15
16
17
18
19
20
import Quick
import Nimble
@testable import MyApp

class MyViewControllerSpec: QuickSpec {
    override func spec() {
        describe("tapping 'Say Hi'") {
            it("says Hi with the name provided") {
                let storyboard = UIStoryboard(name: "Main", bundle: nil)
                let viewController = storyboard
                    .instantiateViewControllerWithIdentifier("MyViewController") as! MyViewController

                viewController.nameTextField.text = "Bob"
                viewController.sayHiButton.sendActionsForControlEvents(.TouchUpInside)

                expect(viewController.greetingLabel.text).to(equal("Hi Bob"))
            }
        }
    }
}
There a few points of interest to note here:
- On line #3 we use the
@testabledeclaration attribute when importing our app. This allows us to reference internal entities of our app for testing purposes without declaring them as public. - On line #10 we instantiate our view controller from the storyboard using the Storyboard ID that we set earlier in the Interface Builder.
- On line #14 instead of directly invoking the
didTapSayHi:method on the view controller, we can test the action is correctly wired up from the interface by sending the action to the button.
Beginners luck?
It’s time to run our test. Press ⌘ U or click Product > Test from the top
navigation.

Uh oh. That didn’t work. We got a EXC_BAD_INSTRUCTION crash.
If you see an NSInvalidArgumentException instead then double check you set the
Storyboard ID in the interface builder and run the test again.
1
failed: caught "NSInvalidArgumentException", "Storyboard (<UIStoryboard: 0x7fb98973b220>) doesn't contain a view controller with identifier 'MyViewController'"
Detective work
Let’s open the Debug area in Xcode to take a look at what went wrong:
⇧ ⌘ Y- or
View > Debug Area > Show Debug Area
In the debug console in the right-hand pane you should see something similar to:
1
2
fatal error: unexpectedly found nil while unwrapping an Optional value
(lldb)
An object we were expecting to be present was nil when we sent a message to it.
Let’s investigate further by expanding the viewController variable in the
Variables view located in the left-hand pane:

What we can see here is that our outlets for the text field, button and label all have nil values. The reason our app crashes is because each of these outlets is declared as an Implicity Unwrapped Optional - this is denoted by the exclaimation mark after the class (e.g. UILabel!). This means we are assuming a value will be assigned to the property and that we won’t encounter nil.
By default, as we create outlets from the interface to the view controller these
properties are declared as implicitly unwrapped optionals because as the code we
write in the view controller lifecycle methods like viewDidLoad occurs after
the view controller has been instantiated.
Shining a light…
We need to trigger the initialization of the UI elements. After we instantiate the view controller from the storyboard in our test, we need to invoke the following methods:
1
2
3
4
5
6
7
// abridged MyViewControllerSpec.swift
let storyboard = UIStoryboard(name: "Main", bundle: nil)
let viewController = storyboard
    .instantiateViewControllerWithIdentifier("MyViewController") as! MyViewController

viewController.beginAppearanceTransition(true, animated: false)
viewController.endAppearanceTransition()
Time to run our tests again (⌘ U). This time round you should see a failure,
but not a crash. Hopefully your debug console has line stating:
1
failed - expected to equal <Hi Bob>, got <Hi Guest>
Now it’s time to complete our implementation and get this test passing. In
MyViewController.swift it’s time to complete the didTapSayHi:
implementation:
1
2
3
4
5
6
7
8
// abridged MyViewController.swift
@IBAction func didTapSayHi(sender: UIButton) {
    if let name = nameTextField.text where !name.isEmpty {
        greetingLabel.text = "Hi \(name)"
    } else {
        greetingLabel.text = "Hi Guest"
    }
}
Finally run the tests again and you should be treated to sweet success. Congratulations!